Prepare and Load the Probe Holder
In order to load the substrate onto the probe holder, you will require the probe holder stand:
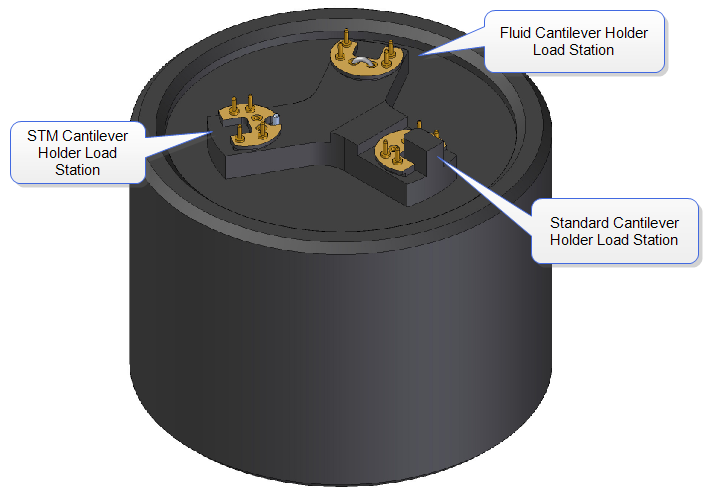
To prepare the probe holder mate the probe holder sockets to the pins of the probe holder stand at the appropriate loading station (fluid, STM, or standard AFM). For AFM applications, ensure that the probe holder's large spring clip faces up.
NOTE: You may install the probe holder on the probe holder stand or scanner in only one orientation because the pins are asymmetrical.
Load the Probe Holder
Install probe substrates face-up so the tip points away from the probe holder. This ensures that the cantilever and tip face toward the sample once the probe holder is mounted on the scanner.
For more detailed information, see Probe Handling and Loading a Probe on the Dimension Scanner.
To install a probe on the AFM probe holder:
- Using sharp tweezers, grasp the substrate firmly on the sides and lift to free the substrate from the wafer or gel-pack. In the gel-pack boxes the tip ends are pointing upward and do not need to be turned over before being placed in the cantilever holder.
- Many silicon nitride substrates have cantilevers on both ends of the substrate. If this is the case, place the substrate under an optical microscope or magnifier and locate the tip you want to use.
- Press down and slide back the spring clip of the standard AFM probe holder:
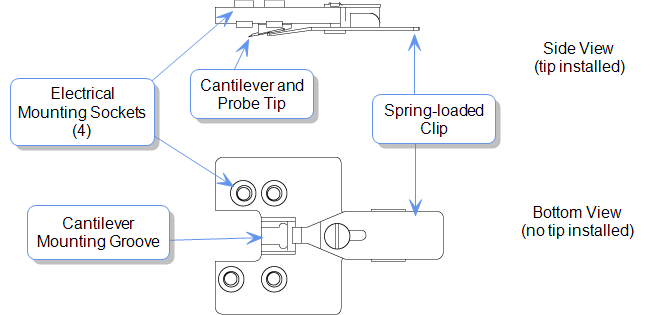
- Orient the cantilever intended for imaging away from the cantilever holder, and place the substrate in the AFM probe holder groove.
- Carefully maneuver the substrate until the substrate is flush against the back edge and laying flat in the probe holder groove.
- Press the spring-loaded probe clip down, gently push forward over the substrate, and release the spring clip to hold the substrate in place in the probe holder groove.
NOTE: Always orienting the substrate to one side and the back of the probe holder groove will improve repeatability of tip location between runs. This will make aligning the laser onto the cantilever quicker and easier when installing new cantilevers.
Previous Steps:
- Select Experiment
Next Steps:
- Install the Probe Holder on the SPM Scanner
- Identify the Probe
- Align the Laser
- Adjust the Photodetector
- Locate the Tip
- Focus on the Sample Surface
When working in TappingMode, the next step at this point is to Tune the Cantilever
- Check Initial Scan Parameters
- Engage, Scan, & Withdraw
| www.bruker.com
|
Bruker Corporation |
| www.brukerafmprobes.com
|
112 Robin Hill Rd. |
| nanoscaleworld.bruker-axs.com/nanoscaleworld/
|
Santa Barbara, CA 93117 |
| |
|
| |
Customer Support: (800) 873-9750 |
| |
Copyright 2010, 2011. All Rights Reserved. |
Open topic with navigation